Introduction
Block paving is a favored option for driveways, walkways, and patios, renowned for its durability and visual charm. Nevertheless, attaining a perfect finish demands meticulous attention, particularly in the realm of cutting in. Cutting-in entails tailoring paving blocks to suit the designated boundaries, guaranteeing a smooth and aesthetically pleasing outcome. Within this extensive guide, we will explore the tools, methodologies, and optimal approaches for becoming proficient in the craft of cutting-in block paving.
Table of Contents
- Block Splitters
- Marking the Blocks
- How to Execute Cutting-In
- Inboard Cutting Technique
- Precision in Joint Width and Cutting Accuracy
- Cutting-in for Different Patterns and Block Types
1. Block Splitters
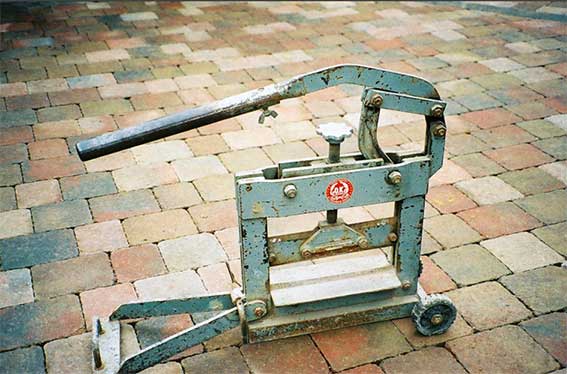
Block splitters are indispensable tools for professional paving contractors and are also available for hire at reasonable rates. These versatile machines come in various sizes to accommodate different materials, ranging from 50mm thick paving blocks to 300mm stone slabs. The most commonly used brick splitters for block work projects have maximum jaw opening of around 100mm and a jaw length of 300-450mm.
2. Marking the Blocks
Marking the blocks accurately is crucial to ensure precise cuts and a neat finish. Follow these simple steps to honor the blocks effectively:
Place the block to be cut against the existing paving, ensuring that its bottom edges align with the top edges of the whole blocks in the body. Overhang the block slightly beyond the intended cut line. Position your eye directly over the cut line. Use a small piece of slate, a steel nail, or a similar object to mark the cut line on the brick, allowing a 3-6mm gap for a joint against the edge. While marking, aim to create a single clear line rather than multiple approximations, as this will make it easier to align the block in the splitter or beneath the saw blade.
3. How to Cut-In
Cutting-in is best done after laying the main body of the paving and ensuring proper alignment. Here are the key steps to master the cutting-in process:
Place the block to be cut in the splitter or under the saw blade. Angle the block within the jaws of the splitter to create an undercut, making it easier to fit the cut piece into the pavement. Use the screw adjuster at the top of the splitter to close the jaws until they grip the block. Pull the operating lever down to snap the block along the cut line. Be cautious when the cut brickand its pieces drop to the ground, as they can break or spall upon impact. To minimize breakages, place an old rug or foam rubber beneath the block splitter. If the cut edges are slightly oversized, trim them with a bolster or cold chisel.
4. Inboard Cutting
Inboard cutting is a technique used to maintain a clean and visually appealing pattern while avoiding small, difficult-to-fit pieces at the edges of the pavement. Here’s how inboard cutting works:
Break the pattern of the paving by inserting half-blocks or total blocks in a different orientation at the edges. This eliminates small, fiddly pieces referred to as ‘darts’ and skinny slices known as ‘slips.’ Ideally, each cut block should have at least three uncut edges, and each cut should be no less than one-third of a block’s size. Following these rules helps achieve a cleaner and more professional finish while minimizing the risk of paving disruptions.
5. Joint Width and Cutting Accuracy
Maintaining proper joint width and cutting accuracy is essential for a polished block paving project. According to BS 7533 Part 3, the standard width between the cut block and the adjacent unit should not exceed 5mm. Avoid overly broad or excessively tight joints, as both can lead to issues.
A well-cut block should fit into the gap without excessive force. A 2-5mm joint width, filled adequately with jointing sand, provides sufficient interlock for pavement strength while preventing spalling.
6. Cutting-In Other Patterns and Blocks
While we’ve primarily discussed the herringbone pattern, these cutting-in principles apply to various ways and brick formats. When working with a basketweave pattern, consider block orientation and avoid slips. For larger format blocks like tumbled pavers, rotate blocks through 90° to simplify cutting-in and maintain a tidy finish.
Conclusion
Mastering cutting in is essential for achieving a flawless paving project. By using the right tools, marking accurately, and following best practices for cutting in and joint width, you can ensure a visually appealing and durable result. Whether you’re a seasoned professional or a DIY enthusiast, these techniques will help you create stunning block paving installations.
Transform your home effortlessly with FloorPup! Discover our extensive range of hardwood flooring, receive tips from expert floor care and maintenance professionals. Our team includes professional floor fitters, skilled driveway pavers, and dependable carpet repair specialists, ensuring top-notch results. Learn more about our dedication to quality on our About Us page. Visit FloorPup and start enhancing your living space today!
FAQS
What is the standard size of a paver block?
However, paver blocks come in various sizes and shapes, offering flexibility for creative and customized design choices.
What is the size of the paver block in MM?
Well, paver blocks come in different dimensions, with standard sizes being 200×100 MM and 230×115 MM. Your choice of size depends on your project’s design and specific requirements.
What is the thickness of the paver block?
Thicker pavers are commonly chosen for heavy-duty applications like driveways, while thinner ones may be suitable for pathways or patios.
How many paver blocks are in 1 square meter?
The quantity varies based on the size of the paver blocks you use. For standard 4×8 inch pavers, you’d require approximately 50 blocks to cover 1 square meter. However, if you opt for larger or smaller pavers, the quantity will differ, so it’s essential to consider the specific size for an accurate calculation.


